
How to Run Your First React.js App Using Visual Studio Code?
Welcome to codesofrohan, in this blog we will se how to run first React App. We will be using Visual studio code for IDE. Because Vs Code provides many inbuilt features. Like, terminals, plugins extensions and shortcuts.
Download Node.js
Before we start with Visual Studio Code, we need to download Node.js. Here's how:
- Open Google and search for "download node.js." Click on the first link that appears, which should be nodejs.org.
- You'll see options for downloading Node.js based on your platform. If you’re using Windows, click the Windows installer. If you're using Mac, select the corresponding option.
- The download will be around 30MB and should take just a few seconds.
Install Node.js
- When you open the Node.js setup, you’ll see a dialog box. Click Next, then accept the license agreement by clicking I accept.
- After reading through the policy, click Next again. The default installation location will be shown. I suggest keeping it as is and clicking Next.
- The setup will also install additional features. You can leave these as default and click Next.
- Finally, click Install and, once it’s done, click Finish.
By following the above steps, it will install NodeJS in your computer. NodeJS will provide the runtime environment to run ReactJs code. You can check if it is installed properly or not by running the following command on you command Prompt:
node -- version
and along with that, when you install NodeJS. It automatically installs npm also. So, check that as well by following command:
npm -- version
Set Node.js Path in Environment Variables (if needed)
If the path isn't automatically added, follow these steps:
- Search for "Node.js" and right-click to select Open file location.
- In the file location, copy the path (for example: C:\Program Files\nodejs).
- Next, search for "Environment Variables" in the search bar and click on Edit the system environment variables.
- Under System Variables, find Path, then click Edit.
- If the Node.js path isn’t listed, click New, paste the copied path, and click OK.
Following these steps will help you to access NodeJS from all over the computer. Or you can understand this as you are basically letting the computer know about the NodeJS app. Now at this point we have all the things it will take to run and build the React’s starter code. Now we will see how to edit the React code. For that we will need an IDE (integrated development environment). Which will be Vs Code obviously.
Download Visual Studio Code
Now that Node.js is installed, the next step is to download Visual Studio Code. Here’s how:
- Open Google and search for "Download Visual Studio Code."
- Click on the first link, code.visualstudio.com.
- Choose the version for your operating system (Windows, Linux, or Mac) and click on it. The download will start automatically.
The download process may take a while. The IDE for Vs Code is rather hefty. However, it clearly depends entirely on your internet speed. Install it after it has finished downloading. Don't forget to check all four boxes during installation. The next image shows the same thing for assistance:

Install Necessary Extensions in Visual Studio Code
To make your React development experience smoother, install the following extensions:
- Prettier: This extension helps with formatting JavaScript and HTML.
- React Code Snippets: This extension generates boilerplate React code, saving you time. For example, typing RFC will generate a React function component.
These are some extensions which will help you to write code faster. These are not something that is necessary. But for a good experience and hassle-free debugging. These are very helpful.
To install extensions:
- Open Visual Studio Code and click on the Extensions icon on the left sidebar.
- Search for and install the above extensions.
Create a React Project using vite
Now that we have everything set up, let’s create a React project.
- Create a folder where your React project will reside. For example, create a folder named React Project on your local disk.
- Open Visual Studio Code and go to File > Open Folder, and select the folder you just created.
- Open the terminal in Visual Studio Code by selecting Terminal > New Terminal.
Now, to create a React app, go to the official React documentation and follow the instructions for creating a new app.
Run the following command in your terminal:
npx create-vite@latest
Answer the questions, following are the questions:
Project name: client
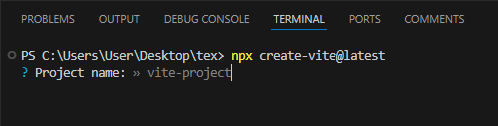
You can write name of your choice at the place of client.
Select the framework: React
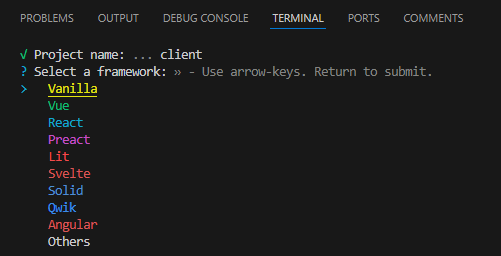
You can use down and up arrow key to switch between frameworks.
Select the variant: JavaScript
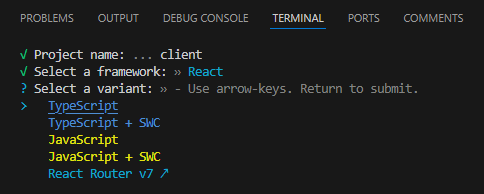
If you know TypeScript then you can move with that. But for this blog we will be continuing with JavaScript.
Run Your React App
Once all the necessary libraries are installed, you’ll see options like npm start and npm test.
First, navigate to your React project folder by typing:
cd client
Run following command to install dependencies:
npm i
Then, start the development server by typing:
npm run dev
Now, following the above 3 steps will automatically open your browser. And a link will be opened “http://localhost:5173”. This is the default URL but if the 5173 port is in use. Then it will be opened on different port which is free. You can customize the page by editing the JS code in src/app.js file. Something like bellow:

Your browser will open with the default React app running. You can customize the code in the src/App.js file to start building your own app. For example, you can modify the App.js file to display "Hello, React!" by replacing the default content.
Conclusion
Congratulations! You’ve successfully built your first website in react. React have many things to offer which will make you development easier. Over that you have Vs Code and NodeJS, which will help you like best friend.
Comments
Add New comment
Login to Comment on this post