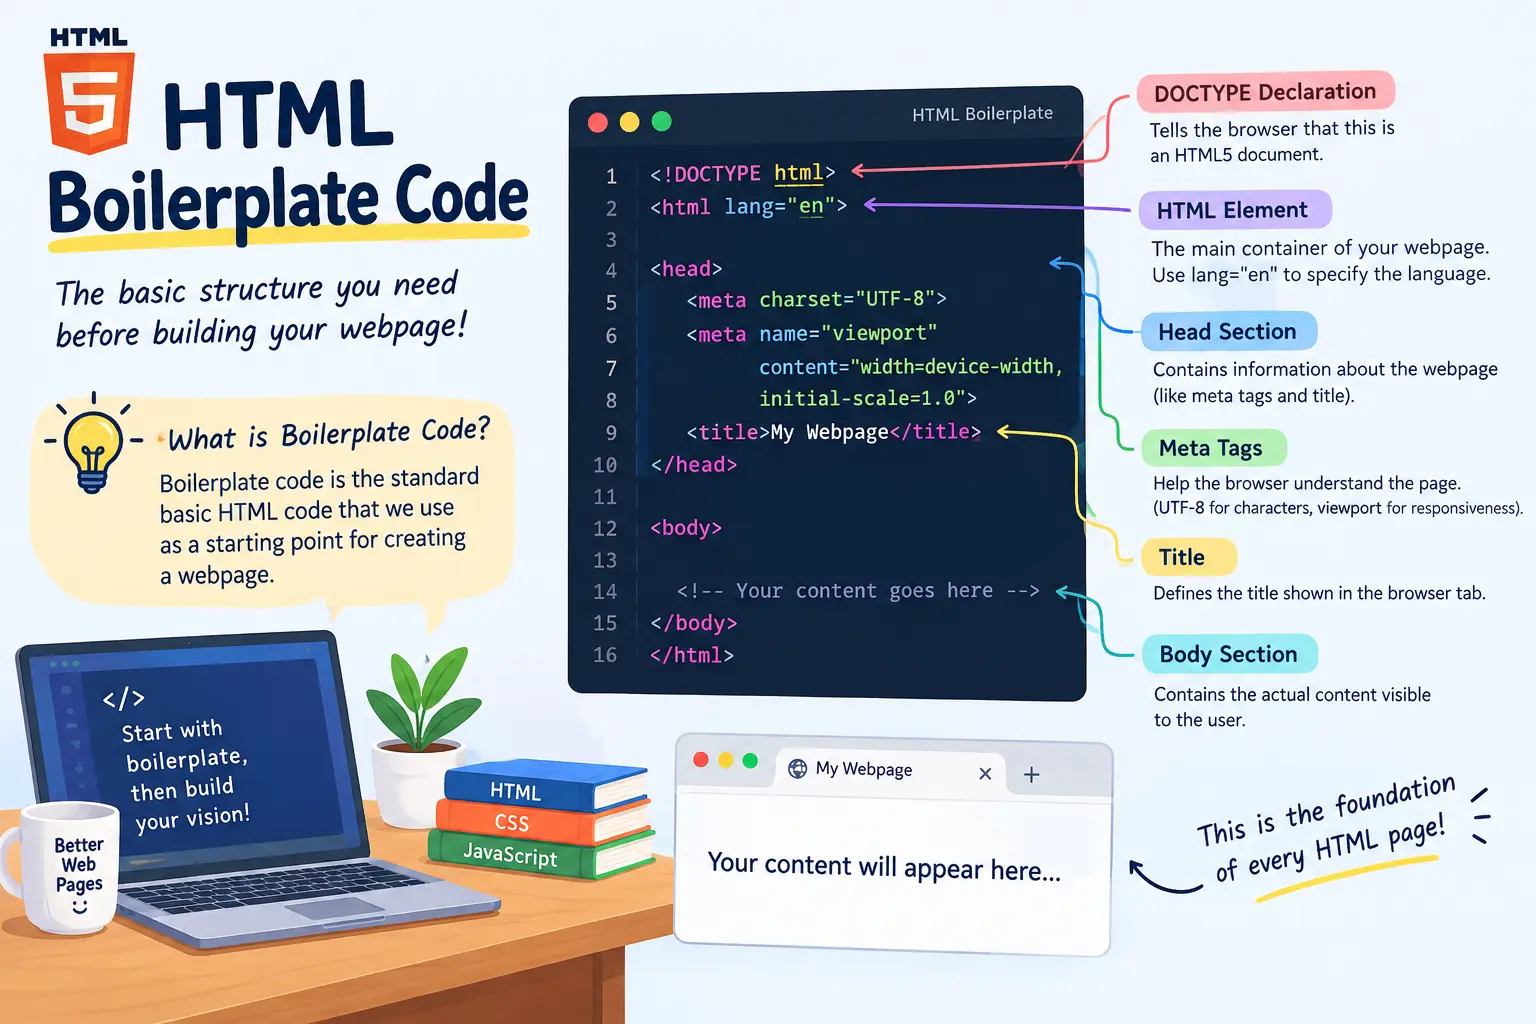
Whenever we start creating an HTML webpage, there is some code that we usually write before adding the actual content of the webpage.
For example, suppose you want to create a portfolio website. You want to add your name, profile picture, skills, projects, and contact information. Before writing all of that, there is a basic structure that you need to create first.
That basic starting structure is called Boilerplate Code.
Now, the word boilerplate might sound complicated, but the concept is actually very simple.
Think about filling out a school admission form.
Every student has different information. One student has a different name, another has a different address, another has different marks, and so on. But the basic form structure is already prepared.
You don't create the form layout from scratch every time.
You simply take the existing structure and fill in your information.
HTML boilerplate works in a similar way.
The basic structure is already defined, and then you add your own webpage content inside it.
What is Boilerplate Code?
In simple words:
Boilerplate code is the standard basic code that we use as a starting point for creating an HTML webpage.
A typical HTML5 boilerplate looks like this:
<!DOCTYPE html>
<html lang="en">

<head>
    <meta charset="UTF-8">

    <meta name="viewport"
          content="width=device-width, initial-scale=1.0">

    <title>My Webpage</title>
</head>

<body>

</body>

</html>
Don't worry if this looks unfamiliar right now.
We are going to understand every important part of this structure.
<!DOCTYPE html>
The first line is:
<!DOCTYPE html>
This is called the DOCTYPE declaration.
Its job is to tell the browser that this document is an HTML5 document.
Think about going to a restaurant.
Before you order, you might tell the waiter:
"I'd like to order from the lunch menu."
The waiter now knows which menu and rules to follow.
In a similar way, <!DOCTYPE html> tells the browser:
"This webpage follows the HTML5 standard."
This helps the browser interpret the document using the modern HTML standard.
For modern HTML webpages, you normally start with:
<!DOCTYPE html>
You don't need to write complicated information here. This simple declaration is enough.
The <html> Element
After the DOCTYPE declaration, we have:
<html lang="en">
And at the end:
</html>
The <html> element acts as the main container for the entire HTML document.
Think about a house.
A house contains different rooms.
The bedroom contains a bed.
The kitchen contains a refrigerator and cooking equipment.
The living room contains a sofa and television.
Even though all these things are different, they are all part of the same house.
The <html> element is similar to that house.
It contains the different parts of our webpage.
For example:
<html>

    <head>
        ...
    </head>

    <body>
        ...
    </body>

</html>
The <head> and <body> are inside the <html> element.
What is lang="en"?
You may have noticed this:
<html lang="en">
Here, lang is an attribute.
It tells the browser and other software what the primary language of the webpage is.
For example:
<html lang="en">
means the webpage is primarily in English.
If you were creating a webpage primarily written in Hindi, you could use:
<html lang="hi">
Think about a book.
If the cover says English, a reader immediately knows what language to expect.
The lang attribute provides similar information about the webpage.
It can also help browsers, search engines, screen readers, and other tools understand the language of the content.
The <head> Section
Inside the <html> element, we generally have two important sections:
<head>

</head>

<body>

</body>
Let's first understand the <head>.
The <head> contains information about the webpage.
For example:
<head>

    <meta charset="UTF-8">

    <meta name="viewport"
          content="width=device-width, initial-scale=1.0">

    <title>My Portfolio</title>

</head>
You can think of the <head> like the information section of a product.
Imagine you buy a smartphone.
The actual phone is what you use, but the box may contain information such as:
-
Product name
-
Model number
-
Specifications
-
Manufacturer information
-
Instructions
The <head> works somewhat similarly.
It provides important information and instructions about the webpage to the browser.
<meta charset="UTF-8">
Inside the <head>, we commonly write:
<meta charset="UTF-8">
This tells the browser what character encoding the document uses.
You may be wondering:
Why do we need this?
Imagine your webpage contains different types of characters:
Hello World
नमस्ते
こんにちは
Your computer needs to understand how those characters are encoded so that they can be displayed correctly.
UTF-8 is a widely used character encoding that supports a huge range of characters.
So this:
<meta charset="UTF-8">
basically tells the browser:
"Use UTF-8 to interpret the characters in this webpage."
You don't need to go deep into character encoding right now. Just remember that this is a common and important part of an HTML boilerplate.
The Viewport Meta Tag
Another common line is:
<meta name="viewport"
      content="width=device-width, initial-scale=1.0">
This is particularly important when we are creating websites that need to work on different screen sizes.
Let's take a real-world example.
Imagine you design a restaurant menu on a large piece of paper.
It looks perfect when you view it on a table.
But now imagine trying to fit that same large menu onto a smartphone screen.
It would be difficult to read because the screen is much smaller.
Websites have the same problem.
A webpage may be opened on:
-
Desktop
-
Laptop
-
Tablet
-
Smartphone
The viewport meta tag helps the browser handle the webpage's layout according to the device's screen.
The important part is:
width=device-width
This tells the browser to use the device's width as the viewport width.
And:
initial-scale=1.0
sets the initial zoom level.
Later, when we learn responsive web design, this concept will become much clearer.
The <title> Element
Next, we have:
<title>My Webpage</title>
The <title> defines the title of the webpage.
For example, if you're creating a portfolio:
<title>Rohan's Portfolio</title>
If you're creating a restaurant website:
<title>Rohan's Restaurant</title>
The title generally appears in the browser tab.
For example, if you open multiple websites:
Google
YouTube
Rohan's Portfolio
Amazon
The browser needs a way to identify each page through its tab title.
That's what <title> provides.
Notice that the <title> is written inside <head>:
<head>

    <title>Rohan's Portfolio</title>

</head>
It is not the same as a heading that appears inside the webpage.
For a visible heading, we would use something like:
<h1>Welcome to My Portfolio</h1>
We will learn about headings separately.
The <body> Section
Now we come to one of the most important parts:
<body>

</body>
The <body> contains the main content of the webpage.
This is where we put things that users actually see and interact with.
For example:
<body>

    <h1>Welcome to Rohan's Portfolio</h1>

    <p>I am a software developer.</p>

    <button>Contact Me</button>

</body>
When the browser loads this webpage, the user will see the heading, paragraph, and button.
Think about a restaurant again.
The restaurant has internal information such as its registration details, configuration, and other operational information.
But when a customer enters the restaurant, they interact with the things actually provided to them:
-
Tables
-
Menu
-
Food
-
Chairs
-
Waiters
-
Billing counter
The <body> is like the customer-facing part of the webpage.
It contains the actual content that the visitor interacts with.
Putting Everything Together
Now let's create a simple portfolio webpage using our boilerplate.
<!DOCTYPE html>

<html lang="en">

<head>

    <meta charset="UTF-8">

    <meta name="viewport"
          content="width=device-width, initial-scale=1.0">

    <title>Rohan's Portfolio</title>

</head>

<body>

    <h1>Hi, I'm Rohan</h1>

    <p>I am a software developer.</p>

    <h2>My Skills</h2>

    <p>HTML, CSS, JavaScript and React</p>

    <button>Contact Me</button>

</body>

</html>
Now let's understand the complete flow.
First:
<!DOCTYPE html>
We tell the browser that we are using HTML5.
Then:
<html lang="en">
We start the main HTML document and specify that the primary language is English.
Then:
<head>
We provide information about the webpage.
Inside it:
<meta charset="UTF-8">
defines the character encoding.
Then:
<meta name="viewport"
      content="width=device-width, initial-scale=1.0">
helps the webpage work appropriately across different screen sizes.
Then:
<title>Rohan's Portfolio</title>
defines the browser tab title.
After that, we have:
<body>
This is where our actual webpage content starts.
We then add:
<h1>Hi, I'm Rohan</h1>
<p>I am a software developer.</p>
and:
<button>Contact Me</button>
These are the elements that the visitor will actually see and interact with.
Do We Have to Write Boilerplate Every Time?
Technically, you could type the structure manually every time.
But developers usually don't do that.
Modern code editors such as Visual Studio Code can generate the basic HTML structure automatically.
For example, when working with an HTML file in VS Code, you can type:
!
and then press Enter or Tab, depending on the editor's Emmet configuration.
VS Code can generate the basic HTML5 structure for you.
This is extremely useful because you don't have to manually type the same structure again and again.
You can then immediately start working on the actual webpage.
Remember the Structure
For now, don't try to memorize every technical detail.
Just remember this simple hierarchy:
<!DOCTYPE html>
        ↓
     <html>
        ↓
   ┌────┴────┐
   ↓         ↓
<head>     <body>
   ↓         ↓
Page       Visible
info       content
And the complete boilerplate:
<!DOCTYPE html>

<html lang="en">

<head>

    <meta charset="UTF-8">

    <meta name="viewport"
          content="width=device-width, initial-scale=1.0">

    <title>My Webpage</title>

</head>

<body>

    <!-- Your webpage content goes here -->

</body>

</html>
Think of the boilerplate as the ready-made foundation of your webpage.
Just like you don't build the foundation of a house from scratch every time you want to build a new room, you don't need to reinvent the basic HTML structure for every webpage.
You start with the boilerplate and then build your webpage on top of it.
Once you understand this structure, you have a solid foundation for learning the rest of HTML because almost every HTML page you create will follow this basic pattern.